Atherectomy Techniques
Despite significant advances in percutaneous coronary intervention (PCI) over the past 40 years, severe calcification in atherosclerotic plaque is the most common cause of poor clinical outcomes in patients.1 With an ageing population, the prevalence of significant coronary calcification is increasing. Severe calcification in coronary arteries is a major challenge in optimal stent deployment and expansion. Intracoronary imaging is invaluable for detecting, localising and quantifying coronary calcification. It is recommended for planning percutaneous PCI, especially when heavy calcium is suspected.2 The interventional devices to modify calcified lesions before balloon angioplasty and stenting can be broadly divided into non-atherectomy and atherectomy strategies. The non-atherectomy strategies are balloon-based lesion modification strategies and comprise of the use of semi-compliant balloon, cutting/scoring balloon, ultra-high-pressure balloon and intravascular lithotripsy.3
This review article, however, focuses on the atherectomy techniques of rotablation, orbital atherectomy (OA) and laser.
Rotablation
Introduction to Rotational Atherectomy
Rotational atherectomy (RA), commonly referred to as rotablation was first introduced over 30 years ago to address complex coronary artery disease characterised by heavily calcified lesions.4 Although the rate of severely calcified coronary lesions treated with PCI is around 20% in Europe, as of 2015, the rate of RA during PCI in the UK stands at just 3.1%, still the highest among European countries where rates range from 0.8% to 3.1%.5,6 Several factors limit the wider adoption of RA, including lack of standardised protocol, insufficient structured training and concerns about procedural complexity and complications.
RA operates on the principle of plaque modification through rotational ablation. It ablates calcified plaque using a diamond-encrusted elliptical burr, rotating at a speed of 140,000–180,000 rpm by a helical drive shaft. This is advanced across the calcified lesion over a special rota guidewire. In most cases, a passage of a single burr is sufficient to smooth the vessel lumen and disrupt intravascular calcium rings, enabling passage of and dilatation of balloons and implantation of stents.
Rotablation can be performed via the radial or femoral arteries, with evidence suggesting comparable outcomes for both approaches.7 Arterial access of 6–7.5 Fr radial or 6–8 Fr femoral is used, depending upon burr size requirement.8,9 Most rotablation procedures can be performed with a 6 Fr guiding catheter which can accommodate burrs up to 1.75 mm. With burr sizes ≥1.75 mm, 7 Fr guiding catheter or transradial sheathless guiding catheters may be used. Use of single curve guiding catheters such as EBU, Judkins or XB, together with coaxial positioning may reduce friction and resistance to the burr passage into the coronary arteries. The two types of guidewires for RA include the ROTAWIRETM (Boston Scientific): ROTAWIRE Floppy and ROTAWIRE Extra Support and the newer ROTAWIRE Drive, which are also ROTAWIRE Drive Floppy and ROTAWIRE Drive Extra Support. The difference between these two types of wire is that the standard ROTAWIRE requires a workhorse guidewire to advance through the complex coronary anatomy and then switching to the ROTAWIRE using an over-the-wire balloon or microcatheter. The ROTAWIRE Drive can be advanced into the lesion directly, thus reducing the reliance on wire exchanging devices and saving procedural time. The radiopaque tip of the ROTAWIRE is positioned as distal as possible from the target coronary segment to prevent wire fracture or burr lodging. It is important to bend the ROTAWIRE smoothly as it is easily kinked preventing the passage of the rota burr or even worse increasing the risk of fracture within the coronary arteries.6 A wide selection of burr sizes are available, ranging from 1.25 to 2.5 mm.10 Single burr with a burr-to-artery ratio of 0.6 is recommended.11 A small burr size (1.25–1.5 mm) should be used for tortuous and long lesions, using only larger burr sizes for aorto-ostial lesions or large vessels with a relatively large minimum luminal diameter.6 A pecking motion of the burr, characterised by a rapid forward push followed by pull-back movement, is the most commonly embraced motion pattern among the experts. This contributes to minimal deceleration with a short duration of individual run of less than 30 seconds. A safe speed of rotablation ranges between 140,000 and 180,000 rpm. A speed lower than 135,000 rpm may be associated with burr lodging whereas a speed higher than 180,000 may cause platelet activation and thrombus formation.12 Rotablation flushing cocktail is connected to a side-port of the rotablator advancer. This continuous infusion (comprising of heparinised saline with a cocktail comprising of verapamil, nitrate or ROTAGLIDETM) is an important component of the procedure as it cools the rotablator turbine and flushes the coronary circulation from debris generated during the ablation.6 Contraindications to RA are listed in Supplementary Table 1. These, however, are relative and as per manufacture guidance.
Step-by-step Guide to Rotational Atherectomy
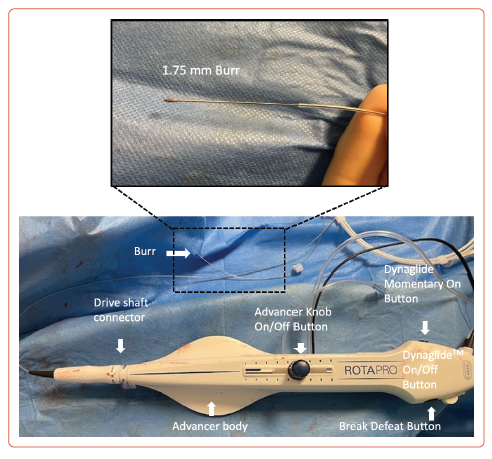
The ROTAPROTM system (Boston Scientific) consists of three main components: the console, the advancer with controls (Figure 1), and the guidewire. Operation of the system requires compressed gas, which is supplied by a compressed air cylinder containing either compressed air or nitrogen. The cylinder regulator can deliver 140 l per minute at 90–110 pounds per square inch (PSI) or 620–758 kilopascals (kPa). The supply hose is connected to the cylinder regulator and inlet at one end and the back of the console at the other end. The console is powered via a power switch.
The ROTAPRO burr catheter and advancer come in a sterile pack in a tray. It should be chosen appropriately sized to the vessel. ROTAPRO should always be inspected for any damage before use. The harness on the advancer is uncoiled and connected to the fibreoptic cable, advancer electrical cable and gas line to the console. The infusion set is attached to administer saline and connected to the infusion port on the advancer. It is recommended to pressurise the saline with an IV pressure bag to ensure steady infusion against arterial pressure. ROTAPRO should never be operated without saline infusion. The burr catheter is then loaded on to the guidewire, feeding the wire into the catheter until it appears at the rear of the advancer and the burr is a few centimetres from the haemostasis valve. The wire clip torquer is then attached to the end of the wire. The ROTAPRO should always be tested prior to inserting the burr into the guiding catheter; the acronym DRAW is useful to ensure all steps are performed before RA is commenced (Supplementary Table 2).
Before inserting the burr catheter into the guide, the advancer knob is moved forward by approximately 2–3 cm and locked in position. The catheter is then introduced through the haemostasis valve under fluoroscopy guidance. Traditionally the burr was gently pushed through the guiding catheter to a point immediately proximal to the lesion, but now it can easily be advanced using the DynaGlide function. When 1–2 cm from the lesion, the advancer knob is retracted fully to prevent the burr from advancing forward when activated. Pressing and releasing the advancer knob button turns on rotation. The console should always be monitored. A yellow triangular outline may appear when the rotational speed drops >5,000 rpm below the free lumen platform speed, which solidifies into yellow triangle when >10,000 rpm. A red stall indicates speed dropping below 15,000 rpm, if the delivery of the compressed gas discontinues if the fibreoptic connection is not properly engaged or if the burr gets stuck in the lesion.
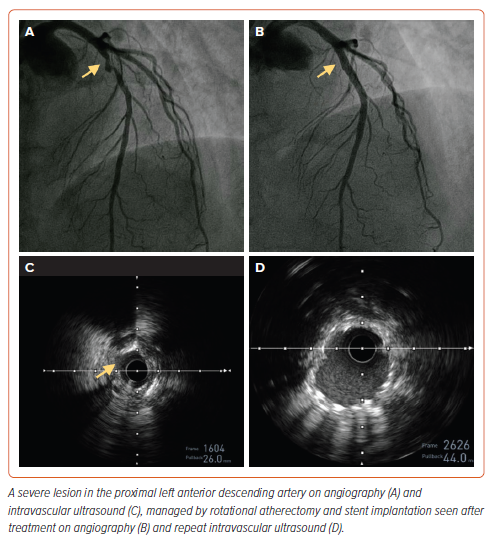
After completing the procedure, the catheter is removed by first pressing the DynaGlide mode button. The ‘break defeat’ button is depressed and the wire clip torquer is pushed into the port until it stops. This locks the break defeat button in the depressed position and eliminates the need to hold it manually. After pressing the DynaGlide ‘momentary on/off’ button, under fluoroscopy guidance, the burr is withdrawn over the guidewire. The DynaGlide momentary on button is released once the burr is out of the guide catheter. An example of calcium modification during coronary angiography using rotablation is shown in Figure 2.
RA offers several strengths and benefits in treating severely calcified vessels with certain anatomical variations such as tortuous vessels and calcific nodules. RA enables successful treatment of calcific nodules by shaving them to create a smoother lumen for stent placement. The rotablator is flexible and can traverse through tortuous arteries, therefore, is able to reach and treat distal vessels. Special caution is required, however, when using RA in tortuous vessels with calcified nodules as the wire bias can increase the risk of perforation. RA minimises barotrauma compared to balloon angioplasty by using mechanical abrasion instead of high-pressure vessel dilation. This approach reduces vessel trauma and minimises the risk of dissections.11,13 Procedural complications are listed in Supplementary Table 3.
Evidence for Rotational Atherectomy
Rotablation is a technically challenging procedure with several factors important in achieving procedural success and optimal patient outcomes. Greater experience correlates with reduced complications, as demonstrated by a study involving high-volume operators in the UK, which revealed fewer adverse outcomes during hospitalisation. The median volume for rotational PCI per operator averages 2.5 procedures per year. Annual volume of less than four procedures may be associated with a higher incidence of major adverse cardiac and cerebral events.14
Two trials that have shown the efficacy of RA are ROTAXUS and the more recent PREPARE-CALC.15,16 The ROTAXUS trial randomised 240 patients to stenting with or without RA. It did not improve outcomes at 9 or 24 months follow-up compared to standard balloon pre-dilatation. Safety outcome at 2 years was also similar between the two groups (major adverse cardiovascular event [MACE] rate of 29.4% versus 34.3% [p=0.47], target vessel revascularisation rate of 19.3% versus 22.2% [p=0.62], target lesion revascularisation rate of 13.8% versus 16.7% [p=0.58]). However, there was a higher procedural success of 92.5% in the RA arm.15 The more recent PREPARE-CALC trial that compared RA (majority under optical coherence tomography guidance) with modified balloons in lesion preparation had a higher procedural success of 98% with RA, and was not associated with an excessive late luminal loss showing that RA is feasible and successful as a primary strategy compared to modified balloons.16 Retrospective studies have previously shown similar outcomes between RA and OA, but a recently published prospective study, DIRO, which directly compared RA and OA for calcified lesions trial (n=100) has shown that patients who had RA for calcium modification had a greater maximum plaque modification area and therefore a greater stent expansion (99.5% versus 90.6%; p=0.02).17
RA techniques have been used to address complex coronary lesions, including left main stem disease. One advanced method is the RA using double guide catheter technique, also referred to as the ‘ping pong’ technique (Supplementary Figure 1).18,19 This technique involves the use of two separate guide catheters, which are inserted into the coronary ostium, allowing better support and manipulation of RA with simultaneous protection of the side-branch wire with a microcatheter. The ping pong technique enhances the ability to safely cross difficult lesions and minimise complications such as vessel trauma and catheter induced dissections. It has also shown to successfully facilitate optimal stent delivery and expansion in complex multi vessel coronary disease.18
Overall, RA is effective in addressing challenging calcified coronary lesions, careful patient selection and operator expertise are important to minimise patient complications.
Orbital Atherectomy
Introduction to Orbital Atherectomy
OA is an alternative tool to RA, used to prepare de novo severely calcified lesions to facilitate stent delivery. Unlike RA where the diamond-tipped burr spins concentrically over the wire, OA features a small eccentrically mounted diamond-coated crown (Supplementary Figure 2). An electrically operated drive shaft spins the crown to 80,000–120,000 rpm. Atheroablation occurs by the centrifugal force exerted on the vessel, thus sanding a thin layer of calcified plaque, while softer tissues are deflected away. Importantly, OA can be performed bidirectionally, significantly reducing the risk of entrapment, a recognised complication of RA. Only a single 1.25 mm crown size is available; however, larger lesions can be debulked by employing higher speeds or by slowing the rate of advancement and thus increasing the orbital arc. A luminal diameter of >2 mm can be achieved by sequential passes at 1 mm/s, although on average, the luminal diameter achieved is closer to 1.5 mm.20,21 The sanding effect produces extremely fine particulate debris, with a mean size of 2 µm (smaller than a red blood cell), resulting in low rates of no reflow or heart block.21 Contraindications for OA are listed in Supplementary Table 4.
Step-by-step Guide to Orbital Atherectomy
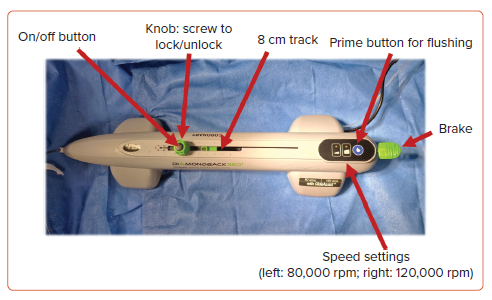
The Diamondback 360TM orbital atherectomy system (OAS) (Abbott Cardiovascular) consists of the orbital atherectomy device (OAD) (shown in Figure 3), and an OAS pump which is ideally mounted onto a pole. A fluid bag containing 20 ml of ViperSlide lubricant in 1,000 ml normal saline is spiked and tubing inserted onto the luer lock of the OAD. It is worth noting that the ViperSlide lubricant contains egg yolk, olive oil and soybean oil; thus, patient allergy status to these substances should be checked prior to the procedure. The saline tubing is then inserted into the grooved guides of the roller pump. Once the pump is turned on via the master switch at the rear of the pump, the green light on the device will illuminate. The blue prime button should be held until purge solution exists the sheath near the crown.
The device must be introduced over a dedicated 325-cm 0.012-inch core-to-tip ViperWire Advance of which there are two varieties: stainless steel ViperWire Advance with a 1.4-g tip load and a nitinol ViperWire Advance with flex tip which has a smaller 1-g tip load. The ViperWire can be used to cross the lesion directly or can be exchanged using a microcatheter after initial wiring with an alternative wire. We recommend pre-treating the lesion with a 1:1-sized non-compliant balloon and performing intracoronary imaging prior to undertaking atherectomy.
The OA crown is then loaded onto the ViperWire with the brake released (in the up position) and ensuring the control knob is in the unlocked position (where the winged segments are perpendicular to the track). Once the crown is ready to be introduced, the brake is activated by pressing the lever down to lock the ViperWire in place and a speed check is performed. It is recommended that the slider is brought to within 1–2 cm of the end of the track as this avoids inadvertently pushing the crown deeply into the vessel and encourages slow advancement.
To introduce the crown to the lesion, the brake lever must be lifted and coordinated with the second operator to hold the wire as the device is introduced to maintain wire position. A single-operator technique has also been described whereby the electric powered handle and wire slack are initially positioned close to the haemostatic valve and the operator introduces the device by relieving the slack.22 The back end of the wire, however, still needs to be controlled as the device is introduced and caution is required to avoid kinking of the wire when using this technique. The GlideAssistTM mode can be used during introduction of the device or if the crown does not track to the lesion. This spins the crown at a low speed (5,000 rpm) and is activated by pressing and holding the low-speed button for 5 seconds and is indicated by a flashing green light. Once at the lesion, the brake lever is pressed down, and the knob is rotated to the lock position (wings parallel to the track). For ostial lesions, the crown should be outside of the guide catheter at the time of activation. The crown is turned on by pressing the button in the centre of the knob and the crown is advanced by moving the unlocked knob from right to left. We recommend holding the knob using a two-handed technique (Supplementary Figure 3) to maintain maximum control over the movement of the knob and to ensure the knob does not slip.
The initial run should be performed at the slower speed (80,000 rpm) although subsequent runs can be performed at the higher speed (120,000 rpm). In each case, slow advancement at 1 mm/s is recommended. Force should not be required to advance the spinning crown and if there is resistance, atherectomy should be halted and the crown should be withdrawn to assess the cause of resistance. For distal lesions, it is important to maintain >5 mm spacing between the drive shaft and the guidewire spring tip to avoid shearing off the tip. In all cases, the device should move in tandem with the knob and the operator should note the pitch of the sound of the crown spinning, which will increase as the calcified lesion is engaged. The device will sound after 15 seconds of atherectomy. It is recommended that each run should be kept to <15 seconds, separated by 30- to 60-second gaps. The total atherectomy time should not exceed 5 minutes (equating to 20 runs at 15 seconds each). The blood pressure and ECG should be monitored continuously, and intracoronary flow can be checked intermittently by angiography. After lesion modification, the crown is withdrawn by releasing the brake and removing the device over the wire with the assistance of the second operator to again maintain ensure wire position is maintained. The device can be delivered and removed using the GlideAssist mode.
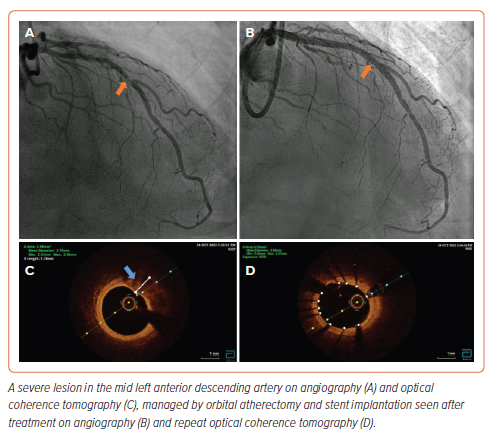
We recommend repeating the intracoronary imaging to examine lesion modification. Examples are shown demonstrating imaging findings before and after OA (Supplementary Figure 4 and Figure 4).
Evidence for Orbital Atherectomy
Two single-arm multicentre real-world prospective studies (ORBIT I and ORBIT II) provided data for the feasibility, safety and efficacy of OA. ORBIT I evaluated the outcomes of OA in 50 patients with a mean age of 57 years. The study recruited from two sites in India and 90% of study participants were males. This study reported a device and procedural success rate of 98% and 94%, respectively.23 MACE occurred in 4% in-hospital, 6% at 30 days and 8% at 6 months. The larger ORBIT II trial was a multicentre prospective study which recruited 443 patients from 49 sites in the US.24 The primary safety endpoint (freedom from 30-day MACE) and efficacy endpoint (residual stenosis <50% post stent without in-hospital MACE) were met in 90% and 99%, respectively. Furthermore, the reported incidence of slow flow or no reflow (<1%), coronary dissection (3%) and perforation (2%) were low while successful stent delivery rates were high (98%). Despite calcified lesions being associated with high restenosis rates, target vessel revascularisation (10%) and target lesion revascularisation (8%) were relatively low at 3-year follow-up.25 Generally, the complication rates from OA were favourable compared to the incidence reported following RA, although a direct comparison is not available. Whether to use one technique over the other depends primarily on operator experience and the availability of the technology. While both techniques are impacted by guidewire bias, there is some evidence that OA creates more calcium modification in larger lumen vessels compared to RA.26 A multicentre randomised trial (ECLIPSE; NCT03108456) is currently under way comparing lesion preparation with OA and conventional balloon angioplasty in severely calcified coronary lesions.
Laser Atherectomy
Introduction to Laser Atherectomy
Laser atherectomy angioplasty was first introduced in the early 1980s.27 It gained popularity in the late 1980s when excimer lasers were developed. It uses pulsatile laser energy and short wavelength for precise ablation of plaque tissue without significant thermal injury to the vessel.28 Since then excimer laser coronary angioplasty (ELCA) is considered a safe and effective technique as adjunct to conventional PCI. Indications and contraindications for ELCA are summarised in Supplementary Tables 5 and 6. However, the device has been used beyond these guidelines in several case reports and our clinical practice.29,30
LASER or light amplification by stimulated emission of radiation refers to high energy single wavelength light beam from a gas mixture. In ELCA, a mixture of xenon gas and diluted hydrogen chloride solution is used. When a high-voltage electrical discharge is passed through this gas mixture, xenon chloride or excimers are produced. These molecules release photons with ultraviolet light at wavelength of 308 nm and via its photochemical (breaking of molecular bonds), photomechanical (creating kinetic energy) and photothermal (heat from the catheter tip) properties, this high-energy laser beam upon contact modifies and breaks down the calcific plaque in coronary arteries.31
Step-by-step Guide to Laser Atherectomy
It is essential that the safety procedure is observed when using laser atherectomy. All staff in the catheter laboratory, including the patient, wear protective tinted spectacles to minimise exposure of the retina to the ultraviolet light. The two laser systems are the CVX-300 Excimer or the newer Nexcimer (Philips). The Nexcimer laser system has a rapid set-up process as it is powered by a 100–240 V electrical outlet and warms up in less than 30 seconds. Once warmed up, the proximal end of the selected catheter is connected to the laser system. Following this, calibration is performed by pointing the tip of the catheter toward the energy detector on the laser system and activating the laser by pressing on the foot pedal. Fluence (the threshold energy required for penetration of ultraviolet light into tissues and creation of a steam bubble, ranged between 30–80 mJ/mm2) and pulse rate (adjusted between 25–80 Hz) are adjusted to the operator’s preference.32
ELCA catheter is advanced on a short monorail segment on any 0.014-inch guidewire. This is a major advantage over other atherectomy devices such as OA and RA that require dedicated guidewires which are often difficult to deliver distally. Coronary catheters are available in four diameters (0.9, 1.4, 1.7 and 2 mm) and the size of the laser catheter should not exceed two-thirds of the reference vessel. Catheter sizing is determined by stenotic severity and size of the proximal vessel (Supplementary Table 7).
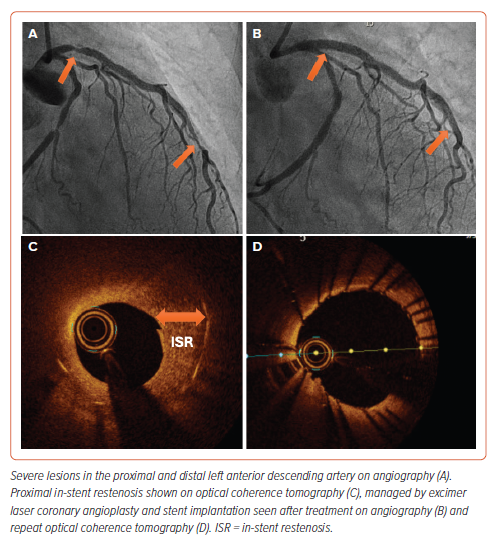
The laser catheter is flushed with heparinised saline prior to introducing it into the guiding catheter. Once the catheter is placed in the lesion under fluoroscopy guidance, the footswitch is depressed, activating the laser system. Slowly advancing the laser catheter (to allow adequate absorption and ablation), allows the laser energy to remove the desired plaque material. We recommend 10 ml saline solution injection during the lasing process to remove contrast and blood from the lasing field, which is thought to reduce the severity of coronary dissections.31 ELCA can also be performed using blood or contrast, but the saline infusion technique is recommended. The footswitch is released to deactivate the system.32,33 It is recommended to start at lower fluence and pulse rate and adapt according to the lesion. The laser catheter is withdrawn from the treated vessel while monitoring the position of the guidewire under fluoroscopy to avoid guidewire prolapse and carefully taken out from the Y-connector. Figure 5 demonstrates imaging findings before and after ELCA.
Evidence for Laser Atherectomy
Earlier studies with ELCA showed a high complication rate with no clear benefit over conventional angioplasty. The first study on ELCA was published in 1994 and included 3,000 patients over 33 sites. The procedural complications were high with 13% dissections (associated with major ischaemic complications in 15% of those patients) and 1% perforation. The procedural success was 90% with adjunct balloon angioplasty.28 Other earlier studies also showed an increased risk of vessel dissection and perforation without achieving a better clinical outcome.34,35 With improvement in technology, operator experience and patient selection, complication rates have reduced significantly in the last decade. The LEONARDO study in 2015 showed that ELCA was successful in treating complex, calcified lesions in 93.7% of patients without any complication rate.36 Kinnaird et al. found no significant association between ELCA use and coronary perforations in a diverse patient cohort from the UK registry, with rates at 0.2% compared to 1% in cases without ELCA use (p<0.001).14 This observation study suggested a favourable safety profile for ELCA in their study population. More recently, since the adoption of the smaller 0.9-mm catheter, our large quaternary centre study has shown a higher rate of procedural success and low rates of periprocedural complication. The findings revealed that 94% of patients had no complications, with a 2% incidence of death, MI and TIA each.38 The 0.9-mm catheters allow 10 seconds of lasing with 5 seconds of automatic time-out. This contrasts with larger catheters, which have a reduced lasing time and a longer automatic time-out period. The extended lasing duration and shorter rest period of the 0.9-mm catheters may offer enhanced precision in ablating calcific plaque material while concurrently reducing procedural time, thus contributing to improved treatment outcomes. The ROLLER-COASTER trial, presented recently at EuroPCR, was the first randomised comparison of RA, ELCA and intravascular lithotropsy in moderate to severe calcified lesions. Preliminary results from 171 patients showed similar success rates in mean stent area (MSA) across all three methods.39
Overall, ELCA has shown technical success due to higher stent expansion but the long-term clinical benefit over conventional PCI remains unclear.
Rotational Atherectomy and Excimer Laser Coronary Atherectomy
In heavily calcified lesions that are balloon uncrossable, initial treatment with ELCA may not itself ablate the plaque sufficiently to adequately deliver a stent. However, laser atherectomy may modify and soften the plaque to facilitate the delivery of a microcatheter, so that the guidewire can be exchanged for a ROTAWIRE to allow further plaque debulking using rotablation. The combined use of rotational and laser atherectomy (RASER) is uncommon. However, in the largest registry to date of 153 cases between 2006 and 2016, RASER did not significantly increase the risk of major adverse cardiovascular events, major bleeding and death.40 More studies are required to support the use of RASER, and the equipment availability and training of operators remain critical factors for its broader adoption.
Conclusion
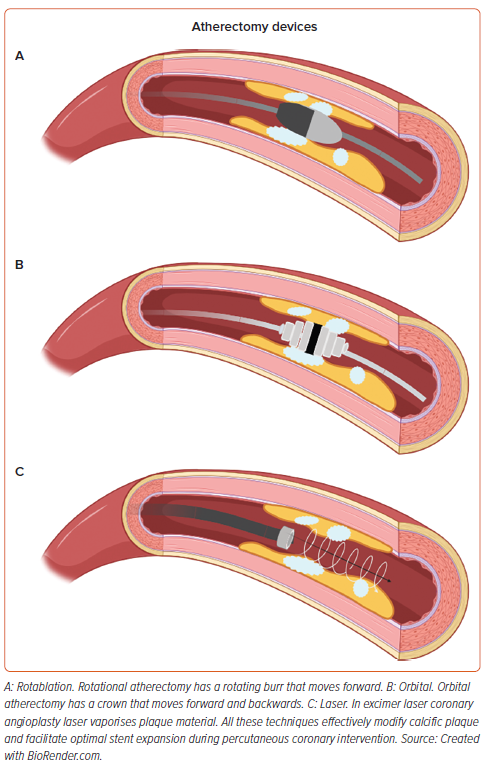
The present paper has explored three atherectomy strategies: RA, OA and ELCA, for modifying calcified plaques in coronary arteries (Figure 6 and Supplementary Table 8). RA and OA primarily rely on tissue debulking and are used to ablate superficial calcium in coronary arteries. Whereas ELCA atheroablation can disrupt deeper calcified plaque by effects including photothermal, photochemical and photomechanical properties. With an ageing population, calcified coronary lesions are more frequently encountered. The selection of appropriate device and training is important for optimal lesion modification to facilitate successful PCI.


